Showing posts with label dessert. Show all posts

Monday, September 07, 2015

Blueberry Custard Pie with Pecan Struesel

Where does the time go?  It's been an unbelievably busy summer as evidenced by my lack of blogging since...April.  Wow.  Now we're in September and life still shows no signs of slowing down.  C'est la vie. 
 My husband just asked, "when did you even make that pie?  Did you make it this year?"

Yes.  But to be fair I can't remember when. 

The lack of blogging is due to being busy outside of the kitchen...but also due to the fact that summer cooking is just different.  There is more grilling, less fancy dishes, more "let's just eat so we can get back outside and get on with our day" type of meals. 

I do still have a handful of photos and recipes that I'll have to gradually put on here...and I promise to share the good ones.  This is one of them.  This pie is easy and delicious so naturally, it was a good fit for me and my love/hate relationship with pie making.  Enjoy!


Blueberry Custard Pie with Pecan Struesel 
Makes one 9-inch pie

Ingredients
1 cup (8 ounces) yogurt (or sour cream)
¾ cup sugar
1 egg
2 tablespoons flour (white or whole wheat)
2 teaspoons vanilla extract
¼ teaspoon salt
2½ cups fresh blueberries
1 (9 inch) unbaked pie crust

Streusel Topping:
½ cup brown sugar
⅓ cup flour
¼ cup butter, softened
½ cup chopped pecans

Directions 
Preheat oven to 400 degrees F.

In a large bowl, mix the yogurt, ¾ cup sugar, egg, 2 tablespoons flour, vanilla extract and salt with a spoon until smooth. Gently fold the blueberries into the custard mixture. Spoon the filling into the unbaked pie crust.

Bake in the preheated oven for 25 minutes.

While the filling is baking, prepare the streusel topping: In a medium bowl combine the brown sugar and flour. Mix the butter in until the mixture resembles coarse sand. Fold in the chopped pecans. After the filling has baked 25 minutes, sprinkle the streusel crunch topping over the top of the pie. 

Bake an additional 15-20 minutes or until filling is set and topping is brown.

Watch so your crust doesn't burn. Either use a crust shield or make a loose foil tent towards the end of baking if it starts to look too brown/burnt.


Remove from oven and let pie sit for at least 10-15 minutes. Serve pie warm or chill it and serve cold.

Friday, January 09, 2015

Apple Cinnamon Galette

As briefly alluded to in an earlier post, I have a love/hate relationship with making pies.  However, I think I found a solution.  Pies are not my thing, I can accept that.  But I think galettes are my new thing…and I’m perfectly happy with the compromise.  

Once you learn the concept of a galette (basically a pastry tart with hand-folded edges), the possibilities are endless.  Sweet fillings could include in-season fruits at any time of year.  Savory fillings could include vegetables, seeds, nuts, and cheeses.  I love that galettes allow you to be creative and give you the freedom to call imperfections “rustic” - the foodie artist’s version of abstract art. 

If you want to experiment with different fillings – I highly recommend reading the suggestions and tips found here.  

Apple Cinnamon Galette

Ingredients:
5-6 small-medium apples (I used organic gala)
1 ½ sticks cold butter
2 cups flour
Pinch of salt
1 tablespoon sugar
Ice cold water
1 teaspoon cinnamon
½ cup sugar (plus more for sprinkling)
1 tablespoon whole milk (or cream) 


Directions:

1) Heat the oven to 400° F (if you have one, place a pizza stone on a low rack). Cut cold, cubed butter into your flour using a pastry cutter, two knives, or your fingers until the largest pieces of butter are about the size of a pea.

2)  Sprinkle ice cold water across the dough and shake the bowl to distribute. Use your hands to mix in the driest patches.  I would start with about ¼ cup water and work your way up until most of the dough is moist but not too much – you will want to be able to roll it out easily.  You can always add a little more flour if needed.

3) Press the dough into a flat, round disc, cover tightly with plastic wrap and place in refrigerator for 30 minutes or so. 


 4) While the dough is chilling, prep the fruit.  I used an apple peeler/corer which I highly recommend but you could also just peel the apples and slice by hand.  Try not to cut the apples too far in advance since they will brown and oxidize as they sit.  Sprinkle a little lemon juice on the slices to help prevent this.  Sprinkle sugar and cinnamon on the apples and mix well. 


 5) Roll out your dough until it’s about 12-inches in diameter and about 1/8-inch thick (don’t worry about it being a perfect circle – remember, “rustic” is beautiful :))  Try not to roll too much, since those butter pieces need to remain intact in order for the dough to stay light and flaky. 

 6) Arrange the fruit on top, leaving about 1 1/2 inches clear around the edge of the dough. To fold the edges, fold the edge nearest to you toward the center. Rotate the galette and lift the adjacent piece of edge, and fold toward the center. The important part is really that there are no cracks where the juices will leak out during baking.  

7)  Brush milk on the crust edges. Sprinkle sugar on the edge. Place in middle rack for about 45-55 minutes, possibly more depending on how caramelized you want things. You can rotate halfway through; keep an eye on it to see how it's going. 


When it's done, lift the parchment paper with the galette onto a cooling rack. Wiggle the galette loose from the paper and gently pull parchment paper out while sliding galette to stay on cooling rack. This is important because it helps air out the underside, which can get soggy. Wait as long as you can until cutting the first slice, and enjoy!

It should stay good for a few days in the fridge and is delicious when warmed up a little bit.  A dollop of vanilla ice cream would add a nice touch but it’s great on its own as well.

I hope you try some different variations of galettes and please share your ideas with me! :)

Monday, September 08, 2014

Banana Cream Pie with Rum Caramel Sauce

Fall is here, but the weather lately still feels like a perfectly warm, but not too hot, summer.  I'm perfectly okay with that and would be happy as a clam to have this weather stay.  Unfortunately I think the cold will come sooner than later. 

With fall comes a lot of great things...beautiful leaves, pumpkin pie, hooded sweatshirts, apple picking, and cool evening bonfires.  But it also means the start of school, which is exciting for most kids - but not for a grown adult returning for his second bachelor's degree and going on 9 years of school.  I'm talking about my husband of course. :)  


Despite the sad feeling that Ryan and I both have of him being back in school again, the good news is that it is his last year (yay!), and his birthday is always around the start of school so it is a nice way to forget the stress of school for a bit and celebrate his life.  So I made him this pie. 

I've never made banana cream pie before, and I never would have said it was a favorite of mine...but when I found this recipe online, I knew I had to have it.  And it was delicious.  However - I swear I made my pastry cream thick enough, and yet is was still a soupy mess to eat despite chilling the cream overnight and the whole pie for hours. :(  I hope that doesn't happen to you if you make this.  If it does - just rest assured that it will still be incredibly tasty...and hopefully that will make up for it. 

I recommend making most of the components of this pie ahead of time to save you the hassle of a lot of steps on the day you would like to serve it.  You can make the crust, pastry cream, and rum caramel at least a day ahead.  You'll just want to be sure to wait to assemble it with the bananas and whipped cream until right before or a few hours before serving. 


I used my mom's famous pie crust recipe that we use for apple pie normally.  You can use any pie crust you want but I just knew this was a tried and true way to go.  Line the crust with some dark chocolate to give it a chocolaty protective barrier between the crust and the cream. 


Alternately layer the pastry cream and slices of banana.  


Isn't it pretty? :)


Top with whipped cream.


Then drizzle salted rum caramel all over the top.  And more on your slice of pie.  And more just on your plate. And then just lick the spoon and rest of container clean....


Serve your delicious but potentially messy pie to guests, or just yourself - and enjoy! :)


Banana Cream Pie with Rum Caramel Sauce
Components:
Pie crust lined with chocolate
vanilla pastry cream
3-4 ripe bananas, peeled and sliced 1/4-inch thick
whipped cream
salted rum caramel

Pie crust lined with chocolate
(Makes enough for two crusts – one to save for later!J)
½ cup butter
1 ½ cups flour
½ tsp. salt
3 oz. bittersweet chocolate, chopped

Vanilla pastry cream
2 cups whole milk
3/4 cup heavy cream
1/2 cup granulated sugar
3 tbsps. Cornstarch
2 tbsps. All-purpose flour
1/4 tsp salt
5 egg yolks
2 oz. unsalted butter, cut into 1/2-inch cubes
1 tsp vanilla extract

Salted rum caramel
3 tbsps. unsalted butter
1/4 cup cream
1/4 tsp kosher salt
1/2 cup granulated sugar
2 tbsps. Rum, divided
1/2 tsp molasses
1 tbsp. water
3/4 tsp vanilla extract

Whipped cream
1/2 cup heavy cream
2 tbsps. Confectioner’s sugar

Make the crust: In a medium bowl, stir together flour and salt.  Add butter and mix until pieces are pea-size (use a pastry blender or hands).  Sprinkle 1 TBSP of water over part of flour mixture, gently toss with fork.  Push moistened dough to side of bowl and repeat using 1 TBSP of water at a time until all flour is moist.  Dived in half and roll into balls.   Shape the disk and wrap in plastic wrap. Refrigerate for 30 minutes. Roll one ball dough out on a floured surface until it is 1/8-inch thick and 12 inches in diameter. Fit it to your pie plate and crimp the edges. Refrigerate the pie plate with the pastry for 15 minutes or until chilled.  Wrap the other ball of dough in saran wrap and place in a Ziploc bag.  Freeze or refrigerator for later use when you want to make another pie. 

Preheat the oven to 400°F and prick the pie dough all over the bottom with a fork. Bake 20-25 minutes or until set and golden in color (press down any air bubbles). Melt the chocolate on half power in the microwave or over a double boiler. Take the pie crust out of the oven and brush the chocolate over the bottom and sides of the pie crust to form a thin, but solid layer. Let cool.

Make the pastry cream: Heat the milk and cream in a medium saucepan until the liquid begins to simmer. Turn off the heat. In a medium bowl, whisk the sugar, cornstarch, flour and kosher salt together. Whisk the egg yolks in until smooth (it’s quite thick). Whisk a little of the hot milk-cream into the egg yolks mixture, adding a little more at a time until half of the hot liquid has been added to the egg yolks. Pour the mixture back into the pan with the rest of the hot milk-cream and whisk constantly over medium-low heat. It should thicken in a few minutes. When the pastry cream is thick, remove from heat and whisk the butter and vanilla extract in until smooth. Cover with plastic wrap, making sure the plastic wrap is in contact with the surface of the pastry cream (to avoid developing a skin) and chill.  (I made mine the night before serving which worked out nicely for chilling and saved me time the next day)
Make the salted rum caramel: In a small saucepan heat the butter, cream, and salt together over medium heat until it begins to boil. Cover and turn off the heat. Stir the sugar, 1 tbsp. of rum, molasses, and water together in a medium saucepan over medium-low heat until the sugar dissolves (it must dissolve or you will brick the whole thing). If the sugar doesn’t seem to dissolve, add a little more water and stir/heat it until it dissolves. Increase the heat to high and bring to a boil without stirring or disrupting the sugar. Let it boil until the sugar turns deep amber (about 6-8 minutes). Whisk the heated butter-cream mixture into the hot sugar. It should bubble up to 2 or 3 times the volume, but keep whisking until incorporated. Whisk in the remaining tablespoon of rum and the vanilla extract. Let cool.  If making ahead, store in a sealed container at room temperature or in fridge.

Assemble the pie: Whip the heavy cream and confectioner’s sugar together until medium-stiff peaks form. Try not to over-whip the cream. Spread 1/4 cup of the pastry cream on the bottom of the pie crust. Arrange a single layer of banana slices over the pastry cream. Pour half of the remaining pastry cream over the banana slices. Spread evenly. Arrange another single layer of banana slices over the pastry cream. Spread the rest of the pastry cream over the banana slices. If you have some banana slices left, make a small circle of slices in the center of the pastry cream. Pile the whipped cream in the center of the pie. Drizzle with salted rum caramel and reserve the rest of the caramel on the side. Serves 6-8.


Recipe adapted from: Use Real Butter

Thursday, July 31, 2014

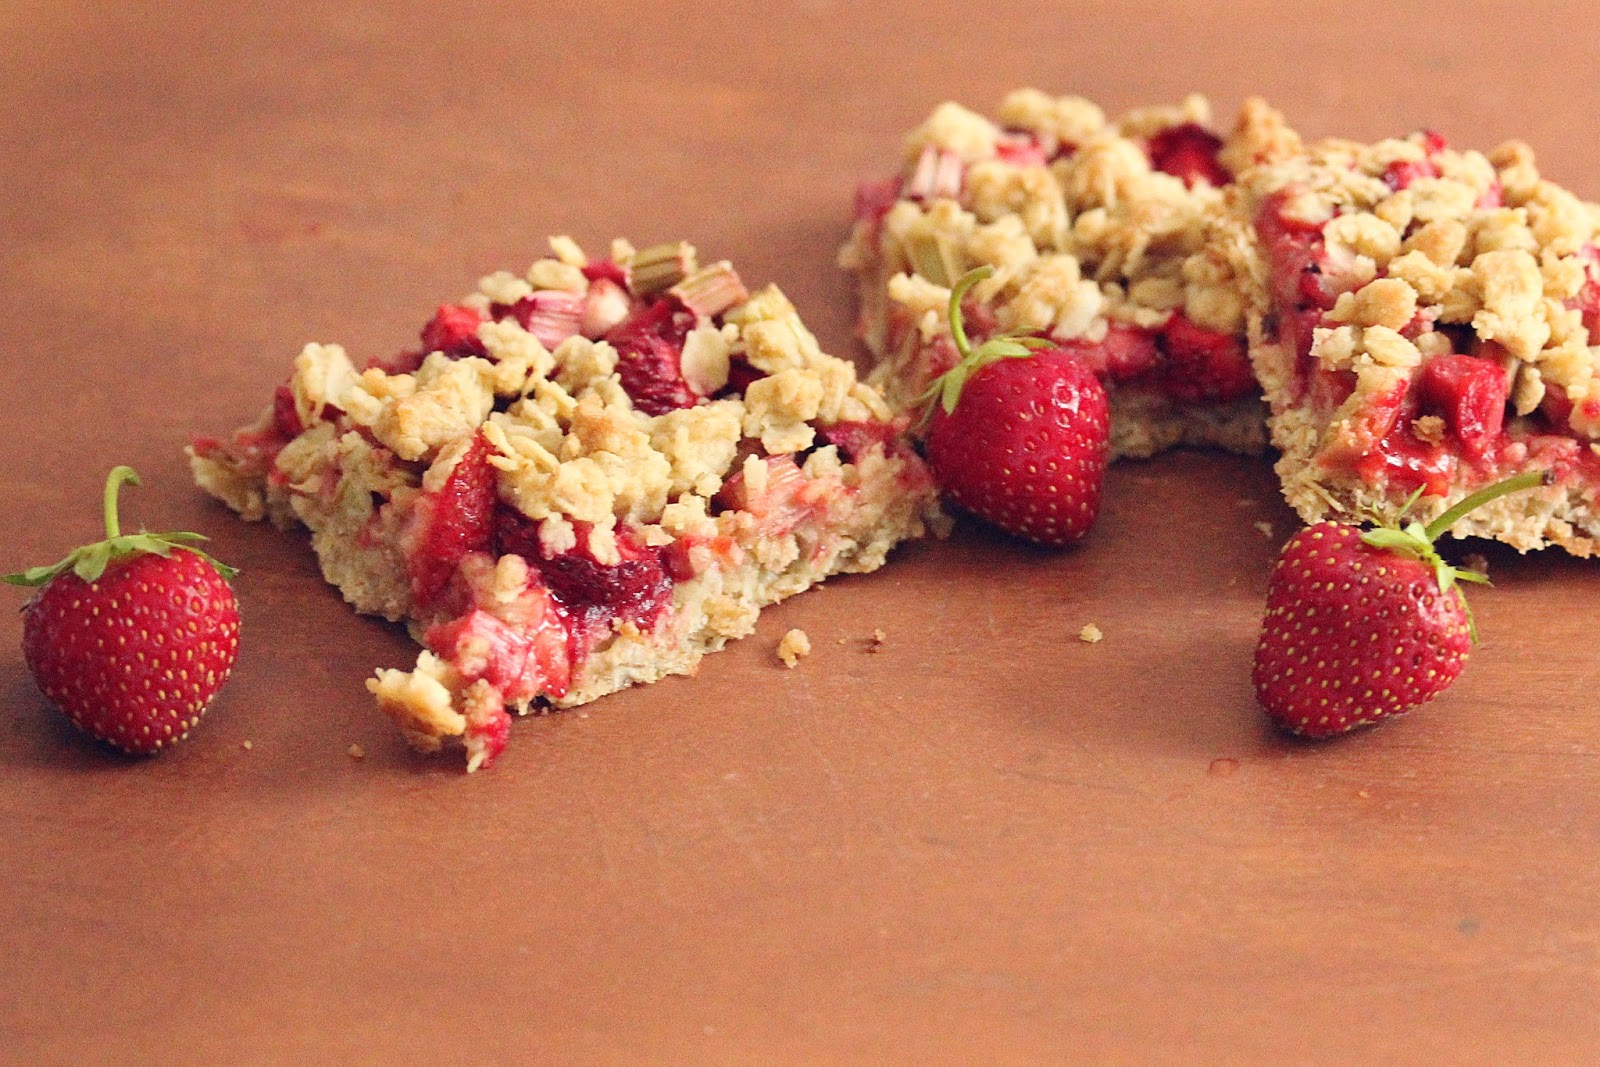
Strawberry Rhubarb Crisp Bars

On a lovely day off of work a few weeks back I went on a little adventure to a farm outside of the city to pick my own strawberries.  It was glorious.  
Picking your own fresh strawberries is ten million times better than buying strawberries from the store.  The taste difference is astonishing.  Scary, even.  Plus, they are cheaper - win win!  It makes me never want to buy strawberries from the store...but unfortunately I probably will because the strawberry picking season is not year round. :( 
The only "problem" with picking your own strawberries is finding ways to use them quickly before they go bad (unless you freeze them).  We did not seem to have this "problem"!  In fact, we ended up just eating most of them just on their own.  However, I did make these delicious crisp bars with them...along with some surprise rhubarb we found growing in our back yard that we didn't plant!  Yay for free food left by previous home owners. :) 

If you have some leftover strawberries or rhubarb...I recommend giving this recipe a try!  Enjoy! 


Strawberry Rhubarb Crisp Bars

Ingredients:
1 cup rolled oats
¾ cup all-purpose flour
½ cup light brown sugar
¼ teaspoon table salt
6 tablespoons unsalted butter, melted
1 cup small-diced rhubarb
1 cup small-diced strawberries
1 tablespoon natural cane sugar, divided
1 tablespoon fresh lemon juice
1 teaspoon cornstarch

Directions: 
1. Heat oven to 375 degrees. Spray an 8-by-8 inch square pan with cooking spray.

2. In a medium bowl, mix the oats, flour, brown sugar, and salt. Add the butter and stir until clumps form. Set aside ½ cup of the crumble mixture and press the rest of the crumb mixture evenly in the bottom of the prepared pan.

3. In the same medium bowl, combine the rhubarb, strawberries, granulated sugar, lemon juice, and cornstarch. Evenly distribute the fruit over the crust, then scatter the reserved crumbs over the fruit.

4. Bake the bars until the fruit is bubbling and the crisp portion is golden, 30 to 40 minutes. Cool completely before serving.

Recipe adapted from The Way the Cookie Crumbles

Wednesday, April 09, 2014

Honey Lemon Cupcakes with Cream Cheese Frosting


I'm in the stage of life where all my friends are having babies.  Literally...almost all of them.  Over the last few years there have been countless weddings...and now, the babies.  Since I probably won't be in their shoes for a while, it's kind of nice to live vicariously through them and hold their babies and watch them experience pregnancy before I have to go through it.  Hopefully someday, God willing, I will be a little bit more prepared because I was able to learn from my friends. 


One of my dear friends had her baby shower recently and I had the pleasure of making the cupcakes for the event.  The baby mama is a huge fan of any thing "lemon" so it was no surprise to me that she requested lemon cupcakes.  I'm a huge fan too.  


The honey & lemon compliment each other nicely in these cupcakes and the cream cheese frosting tops them off with just enough sweetness.  I garnished them with lemon zest but you can feel free to get creative!  Lemon twists or slices would be beautiful as well! 


Honey Lemon Cupcakes with Cream Cheese Frosting 
Makes 12-15 Cupcakes

Cupcake Ingredients:
1/2 cup (1 stick) unsalted butter, softened
3/4 cup granulated sugar
2 eggs
1 1/2 cups all-purpose flour
1 tsp. baking powder
1 tsp. salt
1/2 cup milk
1/4 cup honey
1 Tbsp. fresh squeezed lemon juice
1 tsp. vanilla extract
2 Tbsp. lemon zest

Cream Cheese Frosting Ingredients:
12 ounces cream cheese, softened
6 Tbsp. unsalted butter, softened
1 tsp. vanilla bean paste (or vanilla extract – but the real vanilla bean makes pretty little specks in the frosting and tastes yummy!)
1 tsp. lemon juice
Pinch of salt
6 cups powdered sugar

To make the Honey Lemon Cupcakes:
Preheat oven to 350 degrees. Line a muffin tin with baking cups.

Using an electric stand mixer, cream together butter and sugar on medium-high speed for about 2 minutes.  Add eggs, one at a time, and mix until just combined.

In a separate bowl, whisk together flour, baking powder, and salt. In a smaller bowl, combine milk, honey, vanilla, lemon juice and lemon zest.

Add half of the flour mixture to the butter mixture, beating until just combined. Add in the milk mixture, then add the remaining flour mixture, mixing until just combined.

Fill baking cups 2/3 of the way full (using a ¼ measuring cup usually works well for measuring your batter into the baking cups).  Bake for 17-19 minutes, or until a toothpick inserted in center comes out clean. 

Transfer to a wire rack to cool completely before frosting.

To make the Cream Cheese Frosting:


In a medium bowl, beat cream cheese, butter, lemon juice, vanilla and salt on low until smooth.   Gradually add powdered sugar, 1 cup at a time, on low speed until smooth.  Frost cooled cupcakes.

Recipe adapted from Gimme Some Oven 

Monday, January 13, 2014

Salted Caramel Cupcakes


 I don’t really need an excuse to make dessert – but it is always kind of nice when I do have one. This weekend I had a work Christmas party to go to (gotta love stretching out Christmas into January, right?) and I was tasked with bringing the dessert.  So – I decided on salted caramel cupcakes because, well, who doesn't love cupcakes?  These did not disappoint.  The key is the dark brown sugar which gives the cupcakes their rich caramel color and flavor.  If you’re making them for a party, you’ll want to be sure to plan ahead to have enough if you have a husband or family like mine who tends to “sample” quite a few before the actual event.

I loved the frosting which was like a thick homemade caramel combined with the fluffy texture and sweet flavor of frosting.  For the caramel candies on top I simply cut store-bought caramels in half, dipped one side in melted dark chocolate, sprinkled chunks of sea salt on top and let them cool before placing them on the frosted cupcakes.  It is an extra step but I thought it was worth it because the chocolate caramels were delicious and gave the cupcakes that extra little look of fanciness.  If you are looking for a really easy way to dress up store-bought or homemade caramels, I recommend turning them into salted chocolate caramels – you could wrap them up to give as gifts or simply snack on them when you are looking for a small bite of something sweet.


Enjoy!

Salted Caramel Cupcakes
Makes 14-16 cupcakes 

Ingredients:
CARAMEL CUPCAKES
1 and 1/2 cups all-purpose flour
3/4 teaspoon baking powder
1/2 teaspoon salt
1 cup dark brown sugar
1/2 cup granulated sugar
1/2 cup (1 stick) unsalted butter, softened to room temperature
2 large eggs
1 teaspoon vanilla extract
1/2 cup heavy cream

SALTED CARAMEL FROSTING
1/2 cup (1 stick) unsalted butter 
1 cup dark brown sugar
1/3 cup heavy cream
1/2 teaspoon salt
2-3 cups powdered sugar
additional pinch of salt, as needed
caramel candies dipped in dark chocolate and sprinkled with sea salt for decoration, optional

Directions:
Preheat oven to 350F degrees. Line 12-cup muffin pan with paper liners. Set aside.
In a large bowl, whisk together the flour, baking powder, and salt. In a separate medium bowl, beat the butter and sugars together at medium-high speed until light and fluffy, 2-3 minutes. Add the eggs and vanilla. Beat until combined. Slowly mix in the dry ingredients until no flour remains, scraping down the sides of the bowl as needed. Slowly stir in the heavy cream.  Be careful not to over-mix the batter.

Fill each cupcake liner about 2/3 full.  Bake cupcakes for 22-23 minutes, or until a toothpick inserted in the center of the cupcake comes out clean. Let the cupcakes cool before frosting, about 1 hour. This makes 14-16 large cupcakes, or you can make some into mini cupcakes like I did (not pictured).  The mini cupcakes only need to bake for about 12 minutes.   

While the cupcakes are cooling, melt the butter in a small saucepan. Once melted, add brown sugar and heavy cream. Stir constantly over medium heat until sugar is dissolved. Add salt. Allow to bubble for 3 full minutes, no more. Remove from heat and pour into mixing bowl of your stand up mixer or other large bowl and allow to slightly cool, about 15-20 minutes. Do not place in the refrigerator to cool. 

With a mixer at medium speed, beat in powdered sugar 1 cup at a time, until you reach desired consistency. Add a little heavy cream if you'd like the frosting a little creamier. Add more salt if the frosting tastes too sweet. Frost cooled cupcakes and adorn with salted caramel candies. Cupcakes stay fresh in an airtight container for up to 5 days.

Recipe adapted from Sally's Baking Addiction

Wednesday, October 16, 2013

Apple Pear Plum Crumb


Some very lovely friends picked some apples, pears, and plums from their trees in their own backyard and brought them to us for a housewarming gift.  It was a great gift and a perfect way to "warm our house" when I baked this apple pear & plum crumb.  I'm pretty sure everyone I know has been making apple crisps & pies like crazy lately...so I'm sure this is nothing really mind blowing to you.  'Tis the season for apple picking after all.  But if you have some apples around and want to make something new, give this crumb a try. 

Hope you are enjoying fall and all the fruit it brings... 

Apple Pear Plum Crumb

Fruit Filling 

3 apples peeled and seeded
3 pears, peeled and seeded
1 1/2 cups plum
1/4 cup brown sugar
2 tablespoons cornstarch
½ tsp. lemon zest
a pinch of cinnamon

Crumb Topping

3/4 cup rolled oats
3/4 cup flour
1/2 cup brown sugar
3/4 teaspoon ground cinnamon
Big pinch of salt
1/3 cup butter, melted

Directions:

1. Preheat the oven to 400 degrees F and place a rack in the center.

2. Rinse all the fruit. Cut the apples, pears and plums into bite-sized chunks. Put in medium bowl.

3. In a small bowl, whisk together the sugar, cornstarch, lemon zest, and cinnamon. Sprinkle it over the fruit and gently toss to thoroughly combine. Transfer the fruit mixture to an 8×8 baking pan.

4. To make the crumb topping, whisk together the oats, flour, sugar, and ground cinnamon. Stir in the butter with a fork until a coarse, dough-like topping forms. Sprinkle it in chunks over the fruit in the pan.

5. Bake the crumble for 20-25 minutes, or until the topping is golden brown. Serve with ice cream. 

Recipe adapted from Ma Petite Patisserie 

Saturday, June 08, 2013

Wisconsin Maple Nut Ice Cream

 Summer has been eluding us as of late, but that has not stopped my from making one of my favorite treats...
Today we have been blessed with what looks to be a beautiful summer day (they are so few and far between that I've almost forgotten what they look like)...so I thought this would be the perfect day to post an ice cream recipe.  But just so you know...it doesn't have to be sunny out to enjoy a bowl of ice cream.  House rules. 

Wisconsin Maple Nut Ice Cream
Ingredients
1-1/2 cups almond milk
3/4 cup raw sugar
2 cups heavy whipping cream
1 teaspoon vanilla bean paste
2 tablespoons real Wisconsin maple syrup
1 cup chopped walnuts, toasted

Directions
In a small saucepan, heat milk to 175° (not quite boiling); stir in the sugar. Cool quickly by placing pan in a bowl of ice water; stir for 2 minutes. Stir in whipping cream and extracts.  Toast the walnuts in pan over medium heat for 5-10 minutes.

Fill cylinder of ice cream freezer with the liquid; freeze according to manufacturer's directions. During the last 5 minutes, add the syrup and walnuts. Transfer to a freezer container; freeze for 2-4 hours before serving.

Recipe adapted from Taste of Home

Monday, March 25, 2013

Nutella Banana Cookies

Lately we've been on a banana kick.  
 We've had bananas on toast with peanut butter, raw honey & cinnamon....bananas on waffles with peanut butter & maple syrup...and now, bananas in our cookies.  I picked up some nutella from the store and I thought the combination of nutella & bananas would be delicious.  I was right. 
 This is a great way to use some overly ripe bananas if you have not been able to eat them on time.  They also taste a bit like banana bread, so in my opinion it would be okay to eat these for breakfast.  I would not judge. :) 

Nutella Banana Cookies
Makes about 2 dozen cookies

Ingredients
1 1/2 cups white whole wheat flour
1 cup natural cane sugar (sugar in the raw)
1/2 tsp. baking soda
1/2 tsp. sea salt
3/4 cup shortening (or butter)
2 large mashed ripe bananas
egg
1 3/4 cup oats
1/4 cup Nutella

Directions
Preheat oven to 400 degrees F. 

Sift flour, sugar, baking soda and salt together in a large bowl.  Cut in shortening.  Beat in mashed ripe bananas and egg.  Mix in oats.

Take a knife and "slice" Nutella into batter with a knife. Do not mix it in completely if you want a “swirled” effect. Spoon "drops" onto a greased cookie sheet. Bake at 400 degrees F for about 8-10 minutes. 

Source: adapted from Chef in Training

Tuesday, February 26, 2013

S'more Cookies....anyone?

Tragedy struck our home this weekend...  

...our oven broke.  In the middle of baking a cake.  For my friend's birthday party.  


  The cake was lovingly salvaged by my wonderful husband who smashed two round cake pans of half-raw cake into a 9x13 pan and brought it with us to the party to bake in our friend's oven.  A few days later a repair man came to fix the oven and I am happy to say we are back in the business of baking! :)

Do you have a tragic baking story? 
 Please share so I know I'm not the only one!
Then make a batch of these...

S'more Cookies
Makes about 2 dozen

Ingredients
1/4 cup plus 2 tablespoons white whole-wheat pastry flour
1/4 cup plus 2 tablespoons whole-wheat flour
1/4 teaspoon coarse sea salt
1/4 teaspoon baking soda
1/4 teaspoon baking powder
1/4 teaspoon ground cinnamon
3 tablespoons unsalted butter, room temperature
3 tablespoons packed light-brown sugar
1 large egg
9 large marshmallows, halved
9 ounces semisweet chocolate, coarsely chopped

Directions
Preheat oven to 350 degrees, with racks in upper and lower thirds. In a medium bowl, whisk together flours, salt, baking soda, baking powder, and cinnamon. In a large bowl, using an electric mixer, beat butter and brown sugar on high, scraping down bowl as needed, until light, 4 minutes. Add egg and beat to combine, scraping down bowl as needed. With mixer on low, gradually add flour mixture and beat until combined.

Drop dough by tablespoonfuls, 3 inches apart, onto two parchment-lined baking sheets. With the bottom of a measuring cup dipped in flour, flatten cookies to 2 inches in diameter. Bake until dry and set, about 7 minutes, rotating sheets halfway through. Remove from oven and top each cookie with a marshmallow half. Bake until marshmallows are soft, 2 minutes.

Remove from oven and, with a metal spatula, gently flatten each marshmallow. Let cookies cool completely on sheets on wire racks.

Place chocolate in a medium heatproof bowl.  Microwave bowl chocolate in 30 second intervals, stirring in between until melted, about 2 minutes.  Place one cookie at a time on a fork, submerge in chocolate, then tap fork on edge of bowl to remove excess. Place on wire rack set over a baking sheet. Let cookies set in refrigerator, about 10 minutes. 


 Recipe adapted from Martha Stewart 

Monday, February 18, 2013

Chocolate Caramel Cheesecake

I've always been intimidated by cheesecake.  I have heard horror stories of "cracks down the middle"..."sunk-in tops"..."uncooked middles"...etc.  I was so scared of even attempting to make cheesecake because I was worried it would turn out to be one of my many epic fails.  But finally, I decided to bite the bullet and go for it...

I'm so happy to say...it was a success!  The cheesecake turned out perfectly.  No cracks...no sinkage...just pure deliciousness.  I should have taken a picture of it before I poured loads of caramel and chocolate all over it...but I was so excited to eat it that I didn't take the time to snap proof! 

You'll just have to believe me.  


Let me also preface this recipe by saying....I had to read these directions about 50 times before I started the cheesecake.  Partly because I had to convert the ingredient amounts from Metric to English measurements...and partly because it is a bit long and complicated.  I definitely recommend making the cheesecake the day before because that helps simplify things if you are making this for a special event.  It really is not that hard to make but there are just quite a few steps for all the pieces that come together to make this wonderful creation.  If you are intimidated by this recipe...please don't be.  It is worth it.  If I can do it, you can do it.  (and I recommend that you do!)

Enjoy! :)
Chocolate Caramel Cheesecake 
Oreo Crust:
Oreos - 10 1/2 ounces
3.5 ounces for butter

Cheesecake:
21 ounces Cream Cheese
1 can Sweetened Condensed Milk
¼ cup sugar
4-5 TBSP lemon juice
2 tsp vanilla extract
3 large eggs
4 ounces dark chocolate
Crust & Cheesecake: 
Grease a springform pan (mine was 10-inch but you can use smaller, the cheesecake will be taller then).   Combine Oreo crumbs and melted butter in a bowl.  Press mixture onto the bottom and up the sides of the pan.  Cover the outside bottom and halfway up the sides of the springform with aluminum foil.  Put in the fridge and prepare the cheesecake.
Preheat oven to 320F.  Prepare a water bath by boiling water in a saucepan.  In a bowl, beat cream cheese and sweetened condensed milk until smooth.  Add sugar, lemon juice, eggs, and vanilla extract.  Beat together until fully mixed.  Melt the chocolate and cool.  Mix chocolate with about 1/3 of the cheesecake batter.  First spoon the chocolate batter into the prepared pan, then add the rest of the batter.  Put the springform in a larger pan (such as a rimmed cookie sheet or large roasting pan) which you put in the oven, then pour hot water around the cheesecake.  The water should reach halfway up the sides (if it doesn’t quite reach halfway that’s okay).  Bake for about 1 hour and 15 minutes, or until the cheesecake is set (it should move just slightly).  Let cool completely, then put the whole springform, covered, in the fridge overnight or about 6-8 hours.  

Homemade Caramel:
1 cup heavy cream
¾ cup natural raw sugar
1 ounce butter, softened

Carefully heat the sugar in a saucepan without stirring.  Once the sugar starts melting and becomes a n amber brown color, swirl a few times.  Remove from heat and swirl until the sugar has melted.  Heat the cream in another saucepan.  Add the diced butter to the sugar.  Once the butter is added, keep stirring until it comes together. 

Put the saucepan back on the heat.  Add the cream, a little at a time.  Be very careful, it will spit and spatter like crazy!  Let the caramel boil for a few minutes and then remove the pan from the heat.  Let cool and then pour into a clean jar.  The caramel will harden if the fridge so don’t worry if it is runny.  If the caramel becomes too hard then you can let it sit out at room temperature before pouring on the cheesecake.  

Dark Chocolate Ganache:
4 ounces dark chocolate
½ cup heavy cream
Finely chop the choco
late and place it in a bowl.  Carefully heat the cream in a saucepan until it is very hot, but not boiling.  Pour the hot cream over the chocolate and let sit for about 30 seconds.  Carefully stir until ganache is shiny and smooth.  Let cool. 

Roasted Pecans:
Heat oven to 350F.  Spread the pecans (1/2-1 cup whole pecans) on a baking sheet for 10 minutes or until golden brown and fragrant.  Let cool. 

Assembly: 
Remove cheesecake from fridge.  Place it on a plate or a cake stand.  Remove the sides of the springform.  Pour caramel on top of the cake (as much as you like).  Put back in the fridge.  Meanwhile, prepare the ganache.  Once the ganache has cooled, remove the cake from the fridge and pour ganache on top of the caramel layer.  Garnish with roasted pecans.  

Recipe adapted from Call me cupcake!