Showing posts with label main dish. Show all posts

Friday, February 27, 2015

Roasted Cauliflower "Rice" {featuring Thai Chicken & Vegetables}

I've always loved rice.  Growing up I would beg my mom for a simple bowl of rice & soy sauce for lunch, whereas some kids probably wanted mac n' cheese or peanut butter and jelly.  I realize it's kind of a weird thing to love so much.  Since then I've branched out with different types of rice.  Whether it's fried rice, lemon rice, brown rice, wild rice, etc. - I love it all.  Now I have a new "rice" to love - cauliflower rice!  Have you heard of this?  I had not until I was looking up ideas for using cauliflower because I had just purchased two very large heads of cauliflower for super cheap and I didn't want them to go bad.   Much to my delight - I found a recipe for cauliflower "rice" and I instantly knew that it was right up my alley.  

Whether you're looking for low-carb option or just want to try something new, I highly recommend trying this fun, creative, and delicious way to eat cauliflower!  


Roasted Cauliflower “Rice”
Serves 2-4

Ingredients:
1 head cauliflower
1 tablespoon coconut oil, melted
3/4 teaspoon salt

Directions:
Preheat oven to 425F. Cover a large, rimmed baking sheet with aluminum foil.

Break the cauliflower into florets, removing the stems. Place the florets in the bowl of a large food processor until about ½ full (you will need to do this in multiple batches to ensure all the pieces chop up nicely and are not overcrowded).  Pulse until the cauliflower looks like rice. This takes about 10 to 15 one-second pulses.

Place the cauliflower rice in a large bowl, add the melted coconut oil and salt. Toss with a spoon until the rice is coated with the oil. Spread in a single layer on the baking sheet and roast until tender and beginning to get a few brown spots, about 25 minutes.

Serve with anything that you would normally serve on a bed of rice, such as roasted veggies & chicken with the Thai Peanut Sauce below.    

Note: You can freeze the “rice” before you roast it by sealing it in a Ziploc bag or split into several bags for smaller servings.  When ready to eat, simply thaw, toss with coconut oil and salt and then roast as instructed above.  I had two heads of cauliflower that I got on sale so I roasted some right away and froze 2 other bags for later use.  It worked great when I roasted the frozen cauliflower and tasted just as good.

Chicken & Vegetables with Thai Peanut Sauce
For this particular dish, I pan fried some chicken breast and then sauteed vegetables in the same pan. I've also roasted the vegetables by adding them to the same baking sheet as the cauliflower rice half way through cooking (or less if you want the veggies to stay extra crunchy).  Both ways work great.  You can do peppers, onions, zucchini, broccoli, carrots, and more.  You could also grill the chicken breast, or use pre-cooked shredded chicken that you make ahead in the crock pot. 

Thai Peanut Sauce Ingredients:
2 tablespoons sweet chili sauce (Mae Ploy is my favorite brand)
1 tablespoon rice vinegar
1 tablespoon canned coconut milk
1/2 tablespoon brown sugar
1 teaspoon creamy peanut butter, melted
1 garlic clove, minced
Juice of ½ lime
1/8 teaspoon ground ginger

Mix all sauce ingredients together in a small bowl.  Once cauliflower rice, other veggies, and chicken is done – toss everything together with the Thai Peanut Sauce and top with green onions and peanuts.

Friday, February 20, 2015

Chilled Spicy Noodles {Momofuku Inspired}

A little over a year ago we went to New York City to visit our good friend and get a little escape from the cold Wisconsin weather.  Although New York was not a lot warmer, 40+ degrees felt like a mini heat wave to us back then, and with the below zero temperatures lately, I would gladly take 40+ degrees again.  
 It's probably no surprise that I fell in love with New York, if for nothing else, for the food.  It's also no secret that New York is known for their excellent cuisine and seemingly endless supply of fantastic dining options.  However, I never thought it could be that good.  Every meal I had was the best version of that meal that I'd ever had.  Best sushi, best burger, best dessert, best fried fish, etc.  

One of the best meals we ate there included a dish that I can still practically taste even now a year later - Momofuku's Chilled Spicy Noodles.  Momofuku Noodle Bar is one of David Chang's famous creations and very popular among locals and tourists alike.  This was one of the restaurants we stood in a long line outside to even get in the door...but it was so worth it.  


In recreating this dish, I tried to find copycat recipes online as well as simply look at the ingredient list on the Momofuku menu. It was actually really hard to find anything that looked and sounded similar to the dish but I think this came super super close.  Just to warn you, if you have the dish at the real Momofuku,it is so so SO spicy. The kind of spicy that makes the waitress double check to make sure you actually want to order it.  The kind of spicy that makes you want to keep eating because it's so delicious, and you almost feel that if you keep eating your mouth will somehow magically stop being on fire - but it continues to burn.  Again...so worth it (in my opinion).  However, sometimes things are too spicy to really enjoy, so I toned this version down just a bit - it's still spicy enough to make your nose run but not quite enough to make you drip with sweat.  I know - what a yummy description, right? :)  

A few things make this dish unique: the combination of pork sausage, crispy roasted shallots, candied cashews, the spinach, and of course - ramen.  But it's also unique because it is served chilled - although you can certainly eat it warm or cold and it will still be tasty.  The one thing that I know it's lacking from the Momofuku version is sichuan peppercorn.  I couldn't find it at my grocery store but I only checked my usual place so if anyone knows where I could get some, let me know.  
Lately I've discovered the joy (and sometimes pain) of cooking with whole dried red chile peppers.  The first time I cooked with them they filled the kitchen with what felt like poisonous gas and gave the effects of pepper spray to our lungs.   After adjusting the amount of chile peppers and the timing of adding them to the pan, I think I've developed a less lethal method...so that's a plus. Word to the wise - start with only a few , take all the seeds out, and add other ingredients in the pan quickly after.  They definitely add an unmistakable flavor and kick to any Asian dish and I feel that's what mine have been lacking.  

If you aren't a fan of spicy food - fear not, you can simply omit the chile peppers and still enjoy the flavors in this dish.  But whatever you do - you should definitely go to New York.  

Chilled Spicy Noodles
Serves 2-4

There are quite a few components to this dish but you can make a lot of it ahead of time and since it is a dish that is meant to be served chilled, it won’t matter if things are cold by the time you serve them. 

FLAVORED OIL: (make at the beginning and let sit)
Take about a quarter cup of sesame oil and add one tablespoon of dried red chilies, and one half teaspoon of ground ginger and one clove of garlic, minced.  Let it sit.

CRISPY TOASTED SHALLOTS: Thinly slice shallots, toss with oil, and roast in a 400 degree oven, stirring often to avoid burning. They should be crisp, so about 15 minutes or more should be good.   

SPINACH:
Wash, dry and put aside one handful of spinach per person.

CANDIED CASHEWS:
½ cup of cashews
¼ cup of sugar
2 tablespoons of water

Throw cashews, sugar & water together in a sauce pan and heat it over medium heat until the sugar dissolves. Once that happens, you continue to cook it, stirring occasionally, for about 15 minutes or until the sugar crystallizes.  The cashews will look like a pile of mush with the sugar but as long as it’s crystallized that’s okay – they will get crunchy in the oven next. J

As a final step, scrape the cashews onto a cookie sheet and roast in a 350 degree oven for about 10-15 minutes, or until they are slightly browned and crisp. Stir occasionally to prevent burning. Put aside to cool.

PORK:
1 lb. ground pork
2 shallots
1 tablespoon red chiles (about 4 dried whole chiles, seeds removed)
3 cloves garlic
1/3 cup water
1 tablespoon sugar
Splash of fish sauce
Splash of soy sauce
1-2 scallions, chopped

Fry ground pork until nicely browned and cooked through. Remove from pan and set aside.
Drain excess oil and add sliced shallots (or onions) and cook slowly so that they caramelize. When they are done, add them to the bowl with the pork and mix.

In the same frying pan, add some sesame oil and when it gets warm, add some dried red chilies to your taste.  Wait a 5-10 seconds and then add three cloves of garlic to the pan and continue to sauté them until they become fragrant. Then add 1/3 cup of water, tablespoon of sugar, and two splashes: one of fish sauce, the other of soy (or just soy if you don’t want or have fish sauce). And when that gets to bubbling up, return the pork and shallots to the pan with a big handful of chopped scallions and stir until well mixed. Put aside.

ASSEMBLY:

When you are ready to eat, prepare ramen noodles (I used the good ol’ 25 cent/package instant ramen and just didn’t add the seasoning packet). Drain and toss with the oil and a little bit of soy sauce. Then, into a big bowl drop a handful of spinach leaves, a pile of noodles, a pile of pork, and some candied cashews. Finally, sprinkle the top with the crispy shallots. 

Enjoy!

Recipe adapted and inspired by Momofuku & Stacey Dewolfe

Saturday, February 07, 2015

P.F. Chang's Copycat Chicken Lettuce Wraps


I wish we lived closer to a P.F. Chang's.  It would be very dangerous though...because I'm pretty sure I would want to go there every week. :)  Since I rarely have the opportunity to go there, I have to try to make my own version of some my favorite P.F. Chang's dishes such as these Chicken Lettuce Wraps. 


I was super happy with the result of this recipe and it definitely comes close, if not exact, to P.F. Chang's lettuce wraps.  Also, I found that replacing a tortilla with lettuce for a wrap is my new favorite thing and quite delicious and healthy.  It can be a little bit messy since the lettuce is fragile and might break open but you can always just eat it with a fork if that happens. :)  Hope you give these a try! 

Chicken Lettuce Wraps
Serves 4 

Ingredients: 
1 tablespoon olive oil
1 pound ground chicken
2 cloves garlic, minced
1 onion, diced
1/4 cup hoisin sauce
2 tablespoons soy sauce
1 tablespoon rice wine vinegar
2 teaspoons ground ginger
1 teaspoon Sriracha, or more, to taste
1 (8-ounce) can whole water chestnuts, drained and diced
2 green onions, thinly sliced
Sea salt and freshly ground black pepper, to taste
1 head romaine lettuce (or butter lettuce)

Directions: 
Heat olive oil in a saucepan over medium high heat. Add ground chicken and cook until browned, about 3-5 minutes, making sure to crumble the chicken as it cooks; drain excess fat.
Stir in garlic, onion, hoisin sauce, soy sauce, rice wine vinegar, ginger and Sriracha until onions have become translucent, about 1-2 minutes. Stir in chestnuts and green onions until tender, about 1-2 minutes; season with salt and pepper, to taste.

To serve, spoon several tablespoons of the chicken mixture into the center of a lettuce leaf, taco-style.

Recipe adapted from Damn Delicious

Tuesday, January 27, 2015

Roasted Cauliflower and Mushroom Carbonara

Carbonara is a great comfort food for me.  A classic carbonara includes eggs, cheese (Parmesan or Pecorino), bacon, and cracked black pepper - but variations can include grilled chicken, mushrooms, peas, and various veggies.  This recipe replaces grilled chicken with roasted cauliflower and it's just as delicious and even easier to make. 


This will be a simple post because this meal was so simple to make. :)  And also I just need to get back to my TV show...priorities, you know.


Roasted Cauliflower and Mushroom Carbonara
Serves 4 

Ingredients
1 small head cauliflower, cut into florets
8 ounces mushrooms, quartered
1 tablespoon olive oil
Salt and pepper to taste
8 ounces thin spaghetti (or pasta of choice)
4 ounces bacon cut into 1 inch pieces
1 clove garlic, chopped
2 eggs
1/2 cup Parmesan, grated
Fresh cracked black pepper
Salt to taste
1 tablespoon parsley, chopped

Directions
Toss the cauliflower and mushrooms in the oil, salt and pepper, place on a baking sheet in a single layer and roast in a preheated 400F oven until they start to caramelize, about 20-30 minutes, mixing half way through.

Start cooking the pasta as directed on the package. 

Cook the bacon in a pan, pour off all but a tablespoon of the grease from the pan, add the garlic, cook for 30 second and turn off the heat. 

Mix the egg, cheese, pepper and salt and parsley in a bowl.  Drain the cooked pasta reserving some of the water.


Mix the pasta, egg mixture, cauliflower and mushrooms into the pan with the bacon, adding reserved pasta water as needed.

Recipe adapted from Closet Cooking 

Monday, January 19, 2015

Garlic Chicken with Kale & Wild Rice Casserole


My main focus of winter cooking tends to revolve around meals that will warm us up and make us forget how bitterly cold it is outside, even if that feeling is fleeting and only lasts through dinner.  In the summer my meal planning is simple and often non-existent since we mostly feast on burgers or anything we can throw on the grill, In the winter it's soup or chili, casseroles or curry dishes, etc.

One thing that is great about winter cooking is that most recipes tend to last for at least a few meals. That works out great for me because most evenings after a long day of work, I don't feel like doing much other than curling up under a blanket and watching TV...especially when it's pitch dark out at 5 pm.  Talk about depressing.  But at least I know this season is not forever...although in Wisconsin it certainly feels like it.

You could certainly make these recipes separate since they are so good just on their own, or you could simply pair the Garlic Chicken with plain rice if that's easier for you.  However, I found these two really compliment each other together.  If you're looking for a meal that will warm you up and last your family a couple days at least - then I recommend giving this a whirl.

Garlic Chicken with Kale & Wild Rice Casserole
Serves 4-6 (and leftovers to spare!)

For the chicken: 

Ingredients
3 tablespoons olive oil
4 chicken thighs (I used boneless skinless but I think that bone-in/skin on thighs would be delicious too!)
Sea salt and fresh ground pepper, to taste
1 whole bulb of garlic, peeled, cloves separated
1 cup white wine (any wine that you like, since there will be most of the bottle leftover ;))
3 tablespoons chopped fresh parsley
1 sprig fresh rosemary or teaspoon or so dried

Directions
Heat olive oil in a large skillet.  Add chicken and season with salt and pepper.

Cooking over medium heat, brown the chicken on both sides; about 4 minutes per side.  Remove chicken from skillet and set aside.

Add garlic cloves to the skillet and cook, stirring frequently, until golden; about 3 minutes. Be careful not to burn the garlic.  

Carefully add wine to the skillet.  Stir in parsley and add rosemary.  Transfer chicken back to skillet.
Cover and continue to cook over medium-low heat for 20 minutes, turning the chicken over half way through cooking. Add ¼-cup more wine if it looks too dry when you go to turn over the chicken.


Remove from heat.  Transfer chicken to serving dish and spoon the garlic sauce over the chicken.  Serve.
Kale & Wild Rice Casserole
Ingredients

2 large bunches of Kale, leaves torn
8 oz. mushrooms, sliced
2 tablespoons olive oil
1 tablespoon butter
2 cloves garlic, minced or grated
2-3 teaspoons thyme (dried – or more if using fresh)
1/4 teaspoon nutmeg
1/4 teaspoon salt
1/2 teaspoon pepper
4 tablespoons flour
1 cup whole milk
1 cup chicken broth
1/4 cup heavy cream, canned coconut milk (or just more whole milk)
4 cups cooked wild rice (I used a rice cooker to make this ahead.  Can even be done a day before)
1 1/2 cup Swiss cheese, shredded
2 tablespoons olive oil
2 large sweet onions, sliced into thin rings
Salt and pepper

Instructions
Grease a 2-3 quart casserole dish. Set aside.

Heat a very large skillet (the largest you have!) over medium-high heat. Add all of the torn kale to the skillet and add 1 cup of water. Cover the skillet and cook for 10-15 minutes, stirring occasionally until the kale is wilted. Once the kale is wilted and all of the water has been absorbed, remove the kale from the skillet and set aside.

Return the skillet to medium heat and add 2 tablespoons olive oil. When the skillet is hot, sprinkle in the mushrooms in a single layer. Don't stir them! Let them sizzle until they have caramelized on the bottom, about 2 minutes. When the bottoms are caramelized, toss them once and season with salt and pepper, to taste. Continue to cook without stirring for about 5 minutes. Now add the butter to the skillet and cook until the butter begins to brown. Once the butter is browned reduce the heat and add the garlic, thyme and nutmeg and cook for about 10 seconds. Now add the kale back to the skillet with the mushrooms, garlic and spices and toss well.

Sprinkle the flour over the kale and mushrooms and cook for 1 minute. Add the milk and chicken broth, bring to a boil and cook 2-3 minutes or until there is a thick sauce. Add the extra milk or cream and stir to combine. Remove from the heat and stir in the cooked wild rice. Pour the mixture into the prepared casserole dish.

Preheat the oven to 375 degrees F.

Now wipe the skillet and add the olive oil, cook over medium-high heat. Add the onions and 1/4 teaspoon each salt and pepper. Cook, stirring constantly, until the onions begin to soften, about 5 minutes.  Continue to cook until the onions are golden brown, about 20 minutes.

Sprinkle half the cheese over the casserole and then add the onions and the remaining cheese. Bake the casserole for 20-25 minutes or until the cheese is melted and the onions are crispy. Serve!

Recipe adapted from Half Baked Harvest

Monday, November 24, 2014

Chicken Shawarma with Israeli Salad

I've been branching out in the kitchen with different recipes these days.  From fragrant curries, to slow cooker soups, grilled meats, unique homemade pizzas, and more.  It has been fun to try new things and change up my weekly menu instead of sticking to the "usual" dishes.  I have found that with a little prep the day or night before - I can actually look forward to coming home from work and making dinner because I know the meal is already half-prepped and all I have to do is bake it, or scoop it out of the crock pot.  

With this meal, you can mix all the ingredients up the night before, marinate the chicken - and then simply grill/bake it the next day.  You can even make the salad ahead if you want to, but I found it easy enough to chop up while the chicken was in the oven and that way everything is fresh and ready at the same time. 

Have you been trying any new recipes lately?  Feel free to share!  

Chicken Shawarma with Israeli Salad

Ingredients:
2 lbs chicken thighs (Boneless, skinless or bone in, skin on - which is what I used)
2 T ground cumin
2 T ground coriander
6 cloves minced garlic cloves
2 tsp kosher salt
6 T olive oil
1/4 tsp cayenne
2 tsp turmeric
1 tsp fresh ginger, grated
1 tsp. ground black pepper
2 tsp allspice

Instructions:
Place all in a bowl and mix. Make a paste. Rub chicken on all sides with the marinade and let sit 20 minutes (or up to 24 hours refrigerated).

Preheat oven to 375 F.

Heat a cast iron skillet on high heat and grill chicken on each side for 3-5 minutes until skin is browned.  Finish the chicken in the preheated oven until cooked through – about 35 minutes, checking and flipping after 15 minutes.  Broil on high for 5 minutes to make the skin crispy if desired.  Make sure the chicken reaches a safe temperature of 165 F before serving. 

Enjoy the chicken over Israeli salad, or with rice and veggies.

Israeli Salad 

Ingredients:
2 large tomatoes
1 cucumber (seeds removed or use an English cucumber)
1/2 medium red onion
1 red bell pepper
1 green bell pepper
½ C herbs (I used a blend of fresh basil, mint & cilantro)
Zest of one lemon
Lemon juice (about ½ a lemon)
4 tablespoons olive oil
Salt and pepper, to taste

Instructions:
Chop the first 6 ingredients into a very small fine dice. Place in a large bowl and toss with the lemon zest, olive oil, lemon juice, salt, pepper. Serve with Grilled Chicken Shawarma.

Recipes Adapted from Feasting at Home

Thursday, August 14, 2014

Crispy Chicken Bacon Waffle Wrap with Maple Vinaigrette

So...I think I'm going to start wrapping all my meals in waffles.  It just makes sense.  

It may sound strange...but I promise it is delicious. I know it's natural to think of a waffle as a breakfast food, but you could truly eat this meal at any time of the day!  

Also - these aren't just your regular run-of-the-mill waffles.  These are cheddar waffles. Yeah...that's right.  There is cheddar baked right into every little delicious square.  How awesome is that?  Maybe I'm the only one geeking out right now but I can't help it.  I'm totally going to start putting cheese right in my waffle mix more often.  Think of the possibilities...an egg breakfast waffle wrap? Or maybe a bacon cheeseburger with cheddar waffle instead of a bun?  Let me know if you come up with any other ideas! :) 


The maple vinaigrette adds a nice sweet touch to this savory wrap and it compliments the chicken nicely.  Even though you may be able to put anything on a waffle, maple syrup is still a waffle's best friend in my eyes.  hope you enjoy these as much as I did...no matter what time of day it is! :) 

Crispy Chicken Bacon Waffle Wrap with Maple Vinaigrette 
Serves: 2 - 4

Ingredients:

Crispy Chicken:
2 - 3 Chicken Breast
Buttermilk (enough to cover chicken, 1½ - 2 cups)
1 tsp Salt
½ tsp Pepper
1½ - 2 cups Flour
½ tsp Pepper
2 tsp Garlic Salt
1 Tbsp. Paprika
1 tsp Chili Powder

Waffles:
I make my homemade waffle mix in a big batch so I can use one cup of the dry mix whenever I want to whip up a batch and simply add the wet ingredients below.  You can see my full recipe here. 

1 cup dry waffle mix (or Bisquick)
1 egg
1 cup almond milk
1 teaspoon oil
1 teaspoon vanilla extract
½ teaspoon cinnamon (if desired) 
1 tsp Salt
½ tsp Pepper
½ cup shredded Cheddar Cheese

Maple Vinaigrette:
3 Tbsp. Maple Syrup
1 Tbsp. Apple Cider Vinegar (Bragg’s brand recommended)

Instructions:

For the Crispy Chicken:
In a gallon size Ziploc bag, pour in the butter milk and add 1 tsp of salt and ½ tsp pepper. (Can also add in hot sauce or chili powder if desired…which I always doJ). Seal the bag, place in the fridge for at least 4 hours or preferably overnight to marinate. Take out of fridge for at least 15-30 minutes prior to frying so it can come to room temperature.

Heat at least 2-3 inches of oil in a Dutch oven to about 375°F.  This is a TON of oil…I opted to use the lower end but that could result in you needing to cook the chicken longer and flip often if it is not full covered by the oil. 

In a Ziploc bag or shallow bowl mix together the Flour, Garlic Salt & Pepper, Paprika and Chili powder until well blended.

Place the buttermilk soaked Chicken one piece at a time into Flour mixture and generously coat all over.
Carefully place all the coated Chicken once at a time into the hot oil and deep fry for 5 - 6 minutes.

Remove, drain on a paper towel lined plate and let the chicken rest for 5 minutes.

Add the Chicken back to the hot oil once more this time for 5-10 minutes or until golden brown, remove, drain and keep warm in 300°F oven until ready to serve.  We are basically deathly afraid of under-cooked chicken, so once again – I cooked mine longer, plus the pieces I had were pretty thick.  It might be better to butterfly the breasts and separate so that they don’t take as long to cook, plus a thinner piece of chicken will fit nicely into the waffle wrap!

For the Waffles:
In a bowl, mix together homemade waffle mix, Egg, Milk, Oil, Salt & Pepper and your favorite shredded cheese. Mix well.

Heat waffle iron, spray with cooking spray, pour about ¼-½ cup or recommended amount of batter for your waffle iron, so that you don't have a spill over, close cover and cook for about 4 - 5 minutes or until just golden.

For the Dressing:
Mix Maple syrup and apple cider vinegar in small bowl and set aside until ready to use.

To Assemble:
Fold a warm large round waffle in half add 1 chicken breast, lettuce, crispy smoked bacon, tomatoes, extra cheese, and generously drizzle Maple Vinaigrette and serve with additional Vinaigrette on the side. Enjoy!


Recipe adapted from Little Figgy

Sunday, April 13, 2014

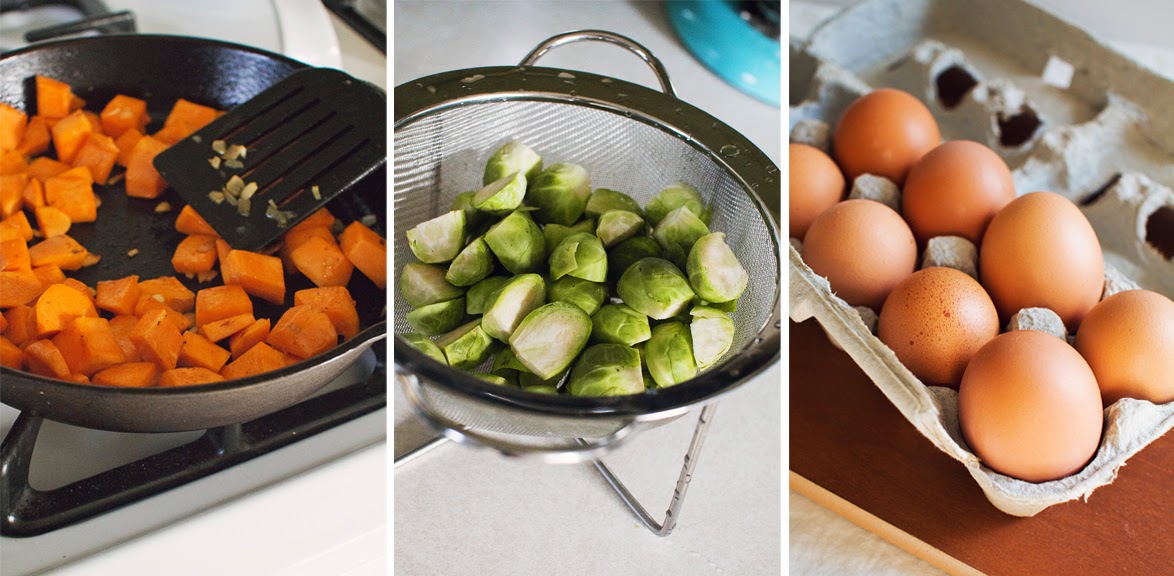
Sweet Potato Hash with Brussels Sprouts and Bacon

One of my favorite things to do is to try a new recipe based solely on what I have on hand in the kitchen.  Usually if you type in a few of the ingredients you have online, you can find almost any recipe.  Sometimes it works better than others.  Luckily, this time it worked – and the result was delicious!  This would make a great main course for a brunch with friends, a weekend breakfast – or in our case, it made for an easy weeknight dinner option!  Gotta love breakfast for dinner! 


If you’re not a fan of brussels sprouts or if you’ve never tried them – I urge you to still give this a shot.  I personally never thought I liked brussels sprouts until a few months ago but it was only because I never really tried them – and the one time I did I think it was at a restaurant and they were simply steamed and not as tasty.  Don’t knock em till you try em…especially caramelized and roasted with some shallots & bacon.  Yum. Now they are pretty much a staple veggie in our house!  

Enjoy :)

Sweet Potato Hash with Brussels Sprouts and Bacon
Serves 2

Ingredients:
4 strips bacon, cut into 1 inch pieces
1 small shallot, diced
1 small sweet potato, cut into 1/2 inch pieces
1 clove garlic, chopped            
½ pound brussels sprouts, trimmed and sliced
salt and pepper to taste
2 eggs

Directions:
Cook the bacon in a pan (preferably cast iron if you have it or non-stick) over medium heat until crisp.  Remove bacon and set aside.

Add the shallot and sweet potato to the same pan you cooked the bacon in and saute until tender, about 5-7 minutes.

Add the garlic and saute until fragrant, about a minute.

Add the brussels sprouts, saute until tender, about 5 minutes, let sit until the bottoms start to caramelize, about 5 minutes.  Mix everything, let sit for 5 minutes and mix it all up again.

Season with salt and pepper to taste.

Create 2 small wells in the hash, add the eggs and cook until the desired level of doneness.  Typically, you might see a hash topped with two fried eggs.  We prefer our eggs scrambled so I whisked them in a small bowl before adding them to the pan.   However, if you prefer a fried egg on top, you can place the pan in the oven to finish cooking the eggs and to ensure that the tops of the eggs cook fully.

Recipe adapted from Closet Cooking 


Wednesday, April 02, 2014

Restaurant Style Mac & Cheese


Mac & cheese has always been one of my favorite comfort foods.  Sometimes you just need a good bowl of mac & cheese, right?  Growing up, of course my mom purchased the boxed mac & cheese - usually an off brand but occasionally we were lucky enough to get the Kraft brand...and even luckier if we got the "shapes" kind.  For some reason the shapes noodles just tasted better...or maybe it was all in my head. 

Now, I'm basically anti-boxed mac & cheese since discovering various homemade versions over the years. It is SO much better from scratch!  One of my favorite recipes is a spicy mac & cheese but this recipe is a tamed down version using american cheese to give it more of that creamy "restaurant style."  In all honesty, I would normally never buy processed american cheese because I prefer "real" cheese...but I happened to need it for another meal so it worked great to have it on hand for mac & cheese.   This is a very kid friendly dish and makes enough to feed a large family or have enough for leftovers throughout the week! 

Restaurant Style Mac & Cheese 
Ingredients: 
2 cups uncooked elbow macaroni
2 tablespoons butter
1 small onion, chopped (1/4 cup)
½ teaspoon salt
½ teaspoon pepper
½ tsp. mustard powder
½ tsp. paprika
1/8 tsp. cayenne pepper (optional)
¼ cup all-purpose flour
1 ¾ cups almond milk
12-15 oz. American cheese (or about 15-20 slices), cut into 1/2-inch cubes
1 oz. pepper jack cheese

Directions:
Heat oven to 375°F. Cook and drain macaroni as directed on package using minimum cook time – or even a little less so it is al dente.

Meanwhile, in 2-quart saucepan, melt butter over medium heat. Cook onion and spices in butter, stirring occasionally, until onion is tender.

In small bowl, mix flour and milk until smooth; stir into onion mixture. Heat to boiling, stirring constantly. Boil and stir 1 minute; remove from heat. Stir in cheese until melted.  In large bowl, mix cooked macaroni with cheese sauce mixture.  Pour into about a 2 quart casserole dish.


Bake about 30 minutes or until bubbly and light brown.

Sunday, March 23, 2014

Fall-off-the-Bone Herb Roasted Chicken with Red Potatoes

This chicken truly did “fall-off-the-bone” and paired perfectly with red potatoes and roasted asparagus!  If you’re looking for an easy meal to serve a lot of guests, or a cheap way to make your meals stretch for a long time – I recommend buying a couple packages of chicken leg quarters and making this dish.

We didn’t have any company coming over so this was a TON of food for just the two of us.  You could certainly cut the recipe in half if you’d like.  However, I made the full recipe which gave us a couple meals just as is – then I took the meat off the remaining leg quarters and packaged up 3 bags of chicken to freeze and use in soups and other meals.  I also had enough bones reserved to freeze two bags to make homemade chicken stock at a later date!  I love turning one night of cooking into many meals for the future.   

  Do you have any other great recipe ideas for using chicken leg quarters?  Please share!

Fall-off-the-Bone Herb Roasted Chicken with Red Potatoes
Serves 8-10 (or save the extra to freeze for future meals!)

Ingredients:
2 cups chicken stock or broth
10-12 chicken leg quarters/thighs, washed and dried
1/3 cup stone ground mustard
1/4 cup fresh lemon juice
1/4 cup soy sauce
2 tablespoons olive oil
Sea Salt & Cracked pepper
2-3 sprigs of rosemary, chopped
1 cup of fresh parsley, chopped
6-8 small red potatoes, washed and cut in quarters

Directions:
Pre-heat the oven to 350 F.

Place chicken leg quarters in 2 large baking dishes. 

Combine mustard, lemon juice, soy sauce, and olive oil, and pour over the chicken. Turn the thighs to coat evenly.

Sprinkle on the herbs; then sprinkle on several pinches of kosher salt and plenty of cracked pepper.  (If you don’t have fresh rosemary & parsley on hand – you can substitute with 2 TBS. of a variety of dried herbs)  Cover with aluminum foil, and roast for 45 minutes. Remove the foil and baste with a bulb baster. Add 2 cups of chicken stock and stir to turn up any of the bits that have formed at the bottom of the roasting pan. 

Add the potato wedges to the pans, tucking them in-between the chicken pieces and covering them in the stock. 


Continue to roast without the foil for 60-70 minutes more, basting every 15 minutes to keep the chicken and potatoes moist.  The thighs will turn a beautiful caramel color and your potatoes should be fork tender.  Save the pan juices and strain them through a colander.  Use the strained liquid as gravy for your chicken and potatoes. I recommend serving with a vegetable such as roasted asparagus.  

Recipe adapted from the Big Bowl of Love cookbook

Wednesday, February 12, 2014

Indonesian Peanut Sauté

If you like Noodles & Company as much as I do...this recipe title probably sounds familiar as it is indeed one of the items on their menu.  You could call this a "copy cat" recipe, but it has enough of a unique twist to make it stand on its own.  I do have to say though that it definitely rivaled the Noodles & Company version and I would go so far as to say that I prefer this homemade version!  With just enough spice and a hint of sweetness, the peanut sauce really brings the dish together and acts as a great base for any stir fry or noodle dish. The leftovers were even delicious enough to justify not joining co-workers in ordering Jimmy Johns...because only packing a "good lunch" can help you avoid that. 


Indonesian Peanut Sauté with Rice Noodles
Serves 4

Ingredients:
1 lb. chicken, cut into thin strips or chunks
Peanut oil
1 Tbsp. chili garlic sauce
Juice of 1 lime
3 cloves garlic, pressed
1 tsp. soy sauce
Pepper (to taste)
8 oz. rice noodles (or about half a package)
1 carrot, julienned
Broccoli florets, chopped
¼ red pepper, sliced & ¼ green pepper, sliced
¼ of an onion, sliced
1 stalk celery, chopped
Bean sprouts
Peanuts (for topping, if desired)

Spicy Peanut Sauce:
1 c. chicken broth
6 Tbsp. crunchy or creamy peanut butter
3 tsp. chili garlic sauce
3 Tbsp. honey
6 Tbsp. soy sauce
2 Tbsp. fresh minced ginger
4-5 cloves garlic, pressed or minced

Instructions:
Heat large skillet, then add oil.  When oil is hot and starts to slightly smoke, add the chicken and sauté for about 7-8 minutes.  Add chili garlic sauce, lime, garlic, ginger, soy sauce, pepper and cook until sauce has reduced and chicken is cooked through and no longer pink. While chicken is cooking, prepare the rice noodles (boil about 5 minutes, to al dente) and make the peanut sauce. After the chicken is cooked, remove from the skillet and rest on plate covered in foil to keep warm. After the noodles are cooked, drain noodles in a colander and rinse with cold water

FOR THE PEANUT SAUCE: Combine chicken broth, peanut butter, chili sauce, honey, soy sauce, ginger, and garlic in a small saucepan over medium-low heat until sauce becomes smooth and well blended.
Re-oil the skillet, add vegetables and sauté about 7 minutes (except for the bean sprouts, add those after about 5 minutes so they stay crunchy and don’t overcook). 

Remove veggies from skillet and place in bowl with chicken.  Add the rice noodles to the skillet and fry for a couple minutes then add the peanut sauce.  Stir together until well mixed.  Top with veggies and chicken and garnish with peanuts if desired.   

Recipe adapted from: Favorite Family Recipes

Sunday, September 22, 2013

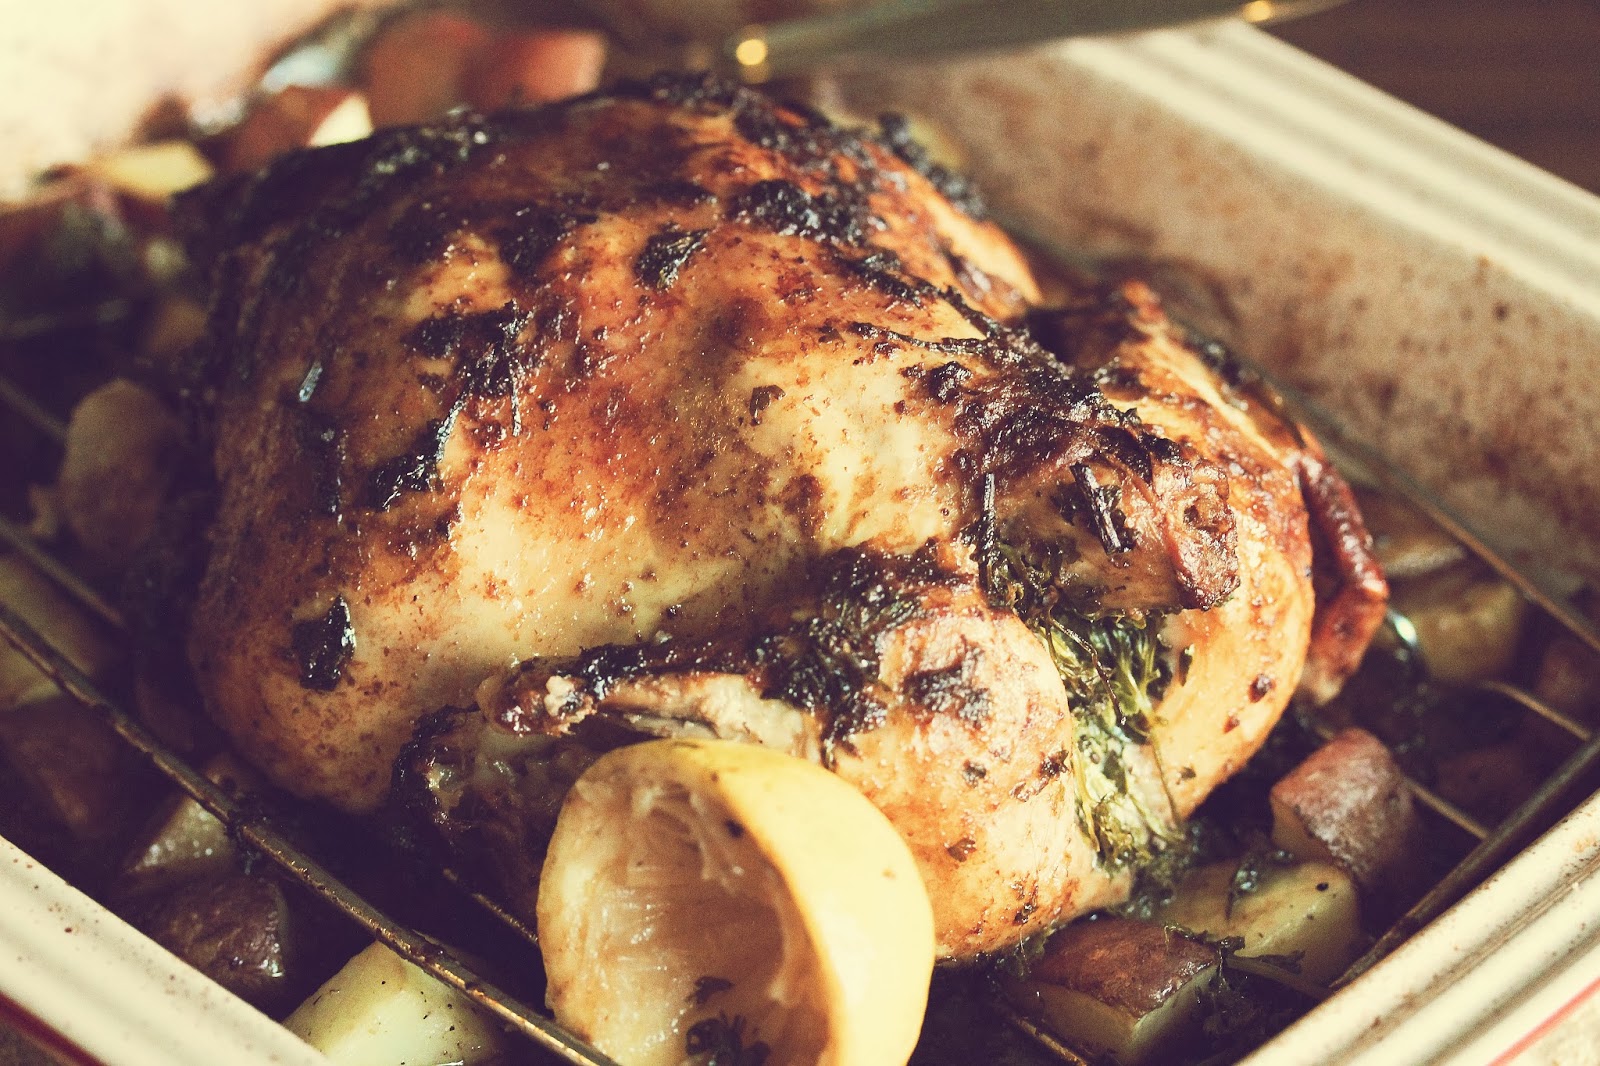
Perfectly Roasted Chicken


I love Sunday afternoons.  They are great for things like naps, long walks, or roasting a whole chicken.  I love it when I can smell the delicious aroma of chicken roasting in the oven mixed with the crisp fall air floating in through the windows.  It is a mouth watering experience, I promise you.  
 For those of you who have never attempted to make a whole chicken before, don't worry - if I can do this, so can you.  If you have made whole chickens before and you are a chicken making machine - then you should definitely try this recipe because it might just become your new favorite.  I know this is definitely my go-to roasted chicken recipe and I can't get enough of it.  
 Hope you enjoy!

Perfectly Roasted Chicken 
6 servings 

Ingredients:
1 ½-2 cups chicken stock or broth (homemade or store-bought)
3.5-4 lb. whole organic chicken, rinsed and dried (gizzards, heart, neck, & liver removed)
¾ cup spicy brown mustard
3 tablespoons olive oil
Juice from 1 fresh lemon; keep lemon rind for stuffing chicken
1/3 cup light soy sauce
2 garlic cloves, crushed
Several sprigs fresh parsley, rosemary, & thyme (or about 1 tablespoon of each if using dried herbs)

Directions:
Rinse the chicken well inside and out.  Pat dry with paper towel and place in a large Ziploc bag. 

To make the marinade, whisk together mustard, olive oil, lemon juice, and soy sauce.  Add the garlic and mix well.  If you have time, add the marinade to the chicken and refrigerate for at least a few hours or overnight.  Otherwise you can pour the marinade over the chicken and bake right away. 

Stuff the lemon rind into the chicken cavity along with half of the fresh parsley, rosemary, and thyme (if using fresh herbs).  Preheat the oven to 350 degrees F. 

Place the chicken in a heavy roasting pan, on a roasting rack preferably.  Wrap the tips of the drumsticks and the wings in small pieces of tin foil to protect them from burning.  Pour the marinade over the chicken and top with the remaining fresh herbs or sprinkle the dry herbs on the chicken.  Cover with heavy-duty aluminum foil and seal tightly.  Try to make sure the foil is not resting on top of the skin, or it will stick and come off when you remove the foil; leave an air pocket in the foil.  Roast covered for one hour.  

Then remove the foil and continue to roast for an addition 30 minutes.  Add about 1 ½ cups chicken stock to the roasting pan.  Using a wooden spoon, scrape the bottom of the roasting pan to loosen the bits that have collecting on the sides and bottom of the pan.  Baste the chicken well.  Continue roasting uncovered for 60 minutes, basting every 15 minutes.  Add more chicken stock if needed. 

When there is about 45 minutes left of baking time I like to add wedges of red potatoes that I mix with a little olive oil and herbs to the pan to cook along with the chicken.  Otherwise you could cook the potatoes separately by steaming them in a pan on the stove or serve the chicken with a different side such as rice.
 
Remove the chicken from the oven.  Remove the chicken from the roasting pan and place it on a caring board to rest for 10 minutes before carving.  Cover lightly with foil. 

Pour the juices from the pan through a strainer and set the juices aside.

Carve the chicken by flipping it over and slicing it down the middle, removing each breast, leg, wing section, and any other meat.  Serve with potatoes or rice and pour the pan juices over the meat. 

Recipe adapted from Big Bowl of Love